Skip to content Skip to main navigation Skip to footer

Tutorials

How to change font on Weebly

How to Change Font on Weebly

Fonts are important part of any website designing to offer a better appearance and readability to visitors. Well, this tutorial explains how to change font in a Weebly website in a very easy way.


How to Change Font on Weebly

Actually Weebly has a built-in feature that lets website owner to easily change font size, type and color for any just elements.

1 To do so, you’d first need to login to your Weebly Site Editor.

2. Once you are on the Weebly Site Editor, browse to “Design Options” under “Theme > Change Fonts” menu located in the left side of the Editor.

How to change font on Weebly

3. You will see all elements used on your website are listed in left hand side panel. Moving the mouse over the element will highlight the corresponding elements on the page. For example, clicking on the the “Headlinne” element will highlight all the “Headline” elements on the page you are in.

Weebly change font

If you liked this tutorial on how to change font on Weebly, then you may consider subscribing to our WeeblyTutorials YouTube Channel for Weebly video tutorials. You can also find us on Twitter and Facebook.

Create a Table of Content in Weebly

How to Create a Table of Content in Weebly Posts and Pages

Ever wondered how to create a table of content in Weebly? Well, you may have seen the table of contents on other websites. A table of contents makes it easier for visitors to jump to the section they want to read in long posts.

It also helps with your Weebly SEO performance because Google and other search engines automatically add a jump to section link next to your website in search results.


Create a Table of Content in Weebly Posts and Pages

The technique that we’re going to explain here uses the fact that in HTML code, anything following a # sign in a link location is considered to be an anchor – a label for specific place on a web-page. We have a tutorial that explains how to create anchor links in Weebly.

In this example, we will be naming our sections as the following Title 1, Title 2, etc., though obviously they can be anything.

Create a Table of Content in Weebly

#1. Preparing the HTML code. Open any text editor software such as notepad that you can use for copying and pasting text.

#2. Go to the page where you want to create the table. Copy the URL for that page, and paste it into the notepad. You will use this as a template. It might be,

https://weeblytutorials.com/start-here

#3. Now open the Weebly Site Editor and go to the page in object. Add a Title element at the top of the page and enter, e.g., “Table of Contents”, or whatever you want.

#4. Add a Text element, and into the text block enter the items in your table of contents, on separate lines, e.g., “Title 1”, “Title 2”, etc.

#5. Select the first entry in the table and click on the “Create Link” widget. In the dialog choose the “Website URL” option. Copy the URL you saved in the notepad and paste into the box.

#6. At the end of the URL, add the pound sign followed by an identifier. You might use, e.g., “#title1”. The full link will then be,

https://weeblytutorials.com/start-here#title1

#7. Repeat from step 5 for the second entry, using the appropriate identifier, e.g., “#title2”.

https://weeblytutorials.com/start-here#title2

#8. Repeat from step 5 as needed.

Related Read: How to Add Tables in Weebly

If you liked this tutorial, then you may consider subscribing to our WeeblyTutorials YouTube Channel for Weebly video tutorials. You can also find us on Twitter and Facebook.

How to add games in Weebly

How to Add Games in Weebly Websites

Weebly is a free and easy to use online service that allows to create your websites via a drag-and-drop interface. Weebly also would be a great option to consider if you don’t exactly have the money to maintain a website and paid for all its expenses.


Creating your website, you probably thought of adding games on it. Well, this tutorial shows how to add games to any Weebly website.

Add Games in Weebly Websites

There are actually two different ways on how to add games into a Weebly website. The first way consists of uploading the file game, also called.SWF file using the Flash element. The second workaround is to copy-paste a ready-to-use script for any game using the embed code element. The two methods are explained below in details.

Add Games Using the Flash Element

Below are the steps to follow on how to put games in Weebly using the Flash element.

  1. Login to your Weebly account dashboard, find and click on edit button to access the Weebly Site Editor.
  2. Look for the build button up at the top of the page and a side menu will come up of the Site Editor interface as this is how we are going to add games into your Weebly website.
  3. From the side menu that just appeared, you are going to hit and drag the Flash Weebly element onto the build section of the page. Clicking on the element you just embedded will open up the settings and from there you will want to click on the upload option.
  4. Once done, you just have to locate the SWF file that you want to embed to your website and upload it into that flash box.

Add Games Using the Embed Code Element

Find below the steps on adding games in Weebly using the Embed Code element.

  1. Just like we did in the above steps, first, you’ll need to access your Weebly Site Editor.
  2. Access the Build section of your Weebly Site Editor.
  3. From the Weebly editing menu, you’ll need to drag and drop the Embed Code element anywhere in your page.
  4. Once done, you’ll have to copy-paste the script of the game you have (could be HTML, Javascript code or any other kind of script) into the Embed Code element you just added.

Put games in Weebl

If you liked this tutorial on how to add games in a Weebly website, you may consider subscribing to our WeeblyTutorials YouTube Channel for Weebly video tutorials. You can also find us on Twitter and Facebook.

Weebly essentials

15 Helpful Weebly Tutorials Everyone Can Benefit From

Weebly is a do-it-yourself online website builder, point blank. That been said, the website builder allows to build fully functional websites in a very easy way.


Here at WeeblyTutorials.com, we thought we’d compile a list of some of the most essentials Weebly tutorials you should be leveraging in your business’ online strategy. All of these tutorials would make your journey building your website with Weebly an easier one.

You’ll find below the 20 must-knows Weebly tutorials any website owner could benefit from.

#1. How to use the Weebly Site Editor

Starting with the Weebly Site Editor. Well, it’s where all of the magic happens: where you’ll add content, design your pages, and customize everything until you are happy with the final results.

This tutorial explains how to use the actually Weebly Site Editor.

#2. How to display images on your Weebly website

It’s not surprising, one of the most common tutorials people look for is how to display images on their websites. While there is usually more than one way to add images in a Weebly website, we’re going to keep it as simple as possible.

#3. How to optimize your Weebly website’s SEO

There no point to create an amazing website when no one can find it. This is why we made available this step by step article on the top 5 easy SEO tips to boost your Weebly website in under an hour.

#4. How to become mobile friendly

It should be no surprise to anyone that browsing the Internet on mobile is a preferred practice to traditional desktop browsing nowadays. Website owners need to make sure that their websites are mobile friendly. Here’s how to turn on the mobile version in Weebly.

#5. How to create a multilingual site with Weebly

Creating a multilingual website with Weebly is much easier than you think. We’ve made it even easier by providing you with the perfect tutorial to get your feet wet and say Hello in so many languages.

#6. How to get a personalized domain for your Weebly website

If you spent quite some time working on the perfect website for your online presence, you should do yourself a favor and have it linked to a personalized domain name. A personalized domain definitely enhances your website’s credibility, boasts a sense of professionalism and helps improving your website overall SEO performance. Well, here’s how to choose the best domain name. We’ve even gone further and made a separate article on how you can easily point any domain to your Weebly website as well.

07. How to create personalized email addresses

Visitors, perhaps new clients will want to get in touch with you after they’ve visited your website. It would be extremely useful and professional to provide them with a personalized email address, means an email that’s linked with your domain name. That actually shows that you’re a well-established brand. Plus, it just looks way better than any other free email provider.

#8. How to use anchors on Weebly

Anchors are sort of links that are very useful to direct your visitors to certain sections of your website. It’s a simple and very engaging way to enhance user experience. Here’s how to create anchor links on Weebly.

#9. How to add apps from the Weebly App Store

The Weebly Editor is already full of features, but sometime you may be looking to extend its functionality in ways that aren’t built-in. This is where the use of Weebly Apps Market comes in.

#10. How to add videos to your Weebly website

Looking to add videos to your Weebly website? Look no further! Weebly allows you to embed any kind of video very easily. Related Read: How to Add Video Streaming in Weebly Website

#11. How to make your Weebly website social friendly

Social platforms have taken over the Internet in more ways than we can describe. The following tutorial explains how to add any sort of social media icons so you can turn your website into a more social-friendly one.

#12. How to embed HTML, CSS or Javascript on your Weebly website

You may want to insert a customized code into your Weebly website. Either to add any extra feature or to simply embed a Javascript code provided by a provider such as Google for analytics purposes for example.

#13. Create Email Newsletter with the Weebly Email Marketing Solution: Weebly Promote

Weebly Promote allows to send beautiful, targeted newsletters to all your contacts in just a few clicks. This would allow you to keep your clients up to date and provide them with regular updates via email.

How to Add Favicon to Weebly Website

A favicon is your website logo that appears next to the meta title on your browser tab. Ever wondered how to add it to your Weebly website? You can get your hands wet now.

How to Add an Image Gallery in Weebly website

An image gallery lets you add images in rows and columns. This allows you to display more photos in less space while also making it easier for visitors to browse them.

If you liked these helpful Weebly tutorials, you may consider subscribing to our WeeblyTutorials YouTube Channel for Weebly video tutorials. You can also find us on Twitter and Facebook.

Weebly Email Marketing

Weebly Email Marketing Solution: Weebly Promote

Email marketing solutions allow to send targeted newsletters to all your clients. This would easily allow you to connect with your clients and keep them engaged, or attract new clients through new email campaigns.


Well, for this, Weebly has an amazing feature called Weebly Promote. The provided Weebly email marketing solution allows to send beautiful, targeted newsletters to all your contacts in just a few clicks.

Weebly Email Marketing Solution: Weebly Promote Features

Create Email Campaigns. Reach out to your clients and prospects with just a few clicks. Send and/or schedule your email campaigns, check their impact and easily integrate with social media platform.

Send Beautifully Designed Emails. Weebly Promote allows to use its pre-designed email templates or to create your own with its simple design tool.

Weebly Promote

Manage your Email Lists. Weebly Promote allows you to easily integrate subscription forms into your existing Weebly website to collect new emails.

Performance, Reporting, and Managed Deliverability. Weebly Promote takes care of your email reputations so they always get into inboxes, and not junk folders. Track your campaign’s success and dive into details like who opened, clicked or unsubscribed.

Weebly Email Marketing Solution: Weebly Promote Pricing

Prices are subject to change by Weebly at anytime.

Weebly Promote Pricing

Weebly Promote: How to Use It?

Weebly Promote can be accessed with the following URL: Weebly Promote.

Before sending your first newsletter, you must have at least one contact list. To create a new contact list, click on the Contact button.

Adding Contacts in Weebly Promote

Choose whatever option you’d like to add your contacts.

Weebly Promote Platform

Creating an Email Campaign

Once your list is ready, you can begin creating your campaign! Click on the “Compose” button and follow the step by process to create an email campaign

Sending compaigns

You have five sections to go through:

  1. Choose Email Purpose
  2. Design Email
  3. Email Information
  4. Add Recipients
  5. Review and Send

Monitoring Performance

Once a campaign is sent to the desired contact list, the performance of the campaign can be checked under “Sent” tab.

Suggested Read: Add a Newsletter Signup Form to your Weebly Website

If you liked this in-depth Weebly vs WordPress comparison, then you may consider subscribing to our WeeblyTutorials YouTube Channel for Weebly video tutorials. You can also find us on Twitter and Facebook.

Bootstrap in Weebly

Adding Bootstrap in Weebly

This tutorial explains how to use Bootstrap in Weebly. Bootstrap is a free open source framework to build responsive layouts using HTML, CSS and JavaScript. Learn more about Bootstrap via its documentation.
The complete CSS and JavaScript for Bootstrap framework can be downloaded from getbootstrap.com website.

How to Use Bootstrap in Weebly

It is quite difficult to use the whole Bootstrap resources as it is with Weebly. It may disturb the existing Weebly theme and results in breaking the website. What it is possible is to use the CSS and JavaScript links at header and footer section of a particular page so that it is easy for you to check the page instead of the whole website for troubleshooting. The JavaScript is to be linked in footer code section and the CSS is to be linked header code section of a Weebly page or at website level. Bootstrap in Weebly Now, using Bootstrap needs a some CSS knowledge and it is very easy to get particular element’s style and apply it on your website. Let us take an example of notification boxes. Bootstrap does offer lot of styling to create such boxes but you may just need to copy the following classes.
<style>
.alert {
padding: 15px;
margin-bottom: 20px;
border: 1px solid transparent;
border-radius: 5px;
}
.alert-success {
background-color: #dff0d8;
border-color: #d6e9c6;
color: #3c763d;
}
.alert-info {
background-color: #d9edf7;
border-color: #bce8f1;
color: #31708f;
}
.alert-warning {
background-color: #fcf8e3;
border-color: #faebcc;
color: #8a6d3b;
}
.alert-danger {
background-color: #f2dede;
border-color: #ebccd1;
color: #a94442;
}
</style>
Paste the CSS code on the header section of your Weebly page or add it in the main stylesheet to be effective at website level. Drag and drop the “Embed Code” element and add the following HTML.
<div class=”alert alert-success”>This is a success box to display any success message to your users!!! </div> <div class=”alert alert-info”>This is a information box to display any information message to your users!!! </div> <div class=”alert alert-warning”>This is a warning box to display any warning message to your users!!! </div> <div class=”alert alert-danger”>This is a danger box to display any error message to your users!!! </div>
It will look like below on your Weebly website
[fusion_code]PGRpdiBjbGFzcz0iYWxlcnQgYWxlcnQtc3VjY2VzcyI+VGhpcyBpcyBhIHN1Y2Nlc3MgYm94IHRvIGRpc3BsYXkgYW55IHN1Y2Nlc3MgbWVzc2FnZSB0byB5b3VyIHVzZXJzISEhCjwvZGl2Pgo8ZGl2IGNsYXNzPSJhbGVydCBhbGVydC1pbmZvIj5UaGlzIGlzIGEgaW5mb3JtYXRpb24gYm94IHRvIGRpc3BsYXkgYW55IGluZm9ybWF0aW9uIG1lc3NhZ2UgdG8geW91ciB1c2VycyEhIQo8L2Rpdj4KPGRpdiBjbGFzcz0iYWxlcnQgYWxlcnQtd2FybmluZyI+VGhpcyBpcyBhIHdhcm5pbmcgYm94IHRvIGRpc3BsYXkgYW55IHdhcm5pbmcgbWVzc2FnZSB0byB5b3VyIHVzZXJzISEhCjwvZGl2Pgo8ZGl2IGNsYXNzPSJhbGVydCBhbGVydC1kYW5nZXIiPlRoaXMgaXMgYSBkYW5nZXIgYm94IHRvIGRpc3BsYXkgYW55IGVycm9yIG1lc3NhZ2UgdG8geW91ciB1c2VycyEhIQo8L2Rpdj4=[/fusion_code]
If you liked this tutorial, then you may consider subscribing to our WeeblyTutorials YouTube Channel for Weebly video tutorials. You can also find us on Twitter and Facebook.

Weebly button

How to Add Buttons in Weebly

There’s actually a Weebly element called “Buttons”. It’s definitely one of the most important elements. For instance, anyone can add a button requesting visitors to download a Word document. It’s sometimes common when you can like the whole theme but the button on that theme may have an ugly style. In such a scenario, it is easy to replace the default Weebly button element’s style with your own custom CSS or with other theme’s button style. Well, this article explains how to add buttons in Weebly.


How to Add Buttons in Weebly

Weebly has a ready-to-use drag and drop button element which can be customized into four different types. Button element is grouped under “structure” category of elements. By default users can add two styles of small buttons and two styles of large buttons.

Weebly Default Button

On all non-responsive themes Weebly uses images to create a button and on all responsive themes the style of the buttons is controlled under “main.less” file.

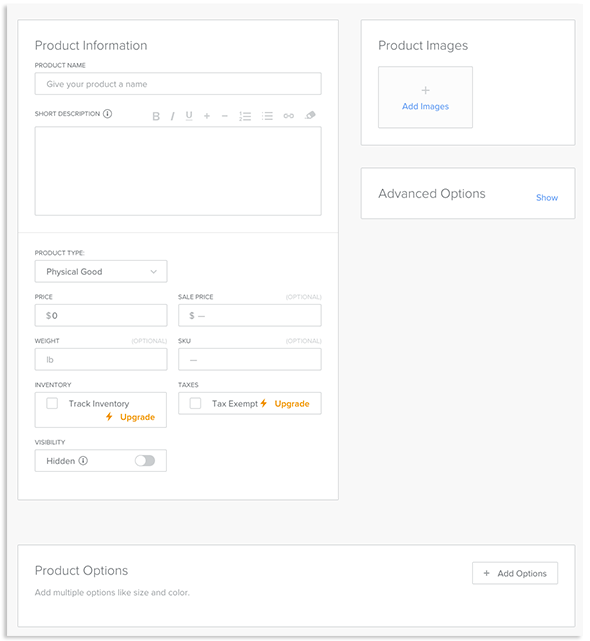
Once drag and dropped, click on the button on your content area to see the following customizing options:

  • Button Text – text to be displayed on the button.
  • Button Style – choose one of the four styles available.
  • Position – center, right or left alignment of button.
  • Link – add links to button text.
  • Spacing – adjust top and bottom margins.

Weebly Button Element Options

Responsive Vs Non-Responsive

Before trying to change the style of your buttons, check what type of theme you are currently using. There are three types of buttons used on Weebly themes:

  • CSS buttons on responsive themes – example theme Slick, Cento.
  • CSS buttons on non-responsive themes – example theme Cleancut.

Non-responsive themes with image buttons – here the button element uses image and the CSS just calls this image as a background, example theme is City.

Non-responsive themes with CSS buttons – themes like Cleancut uses complete CSS buttons without images though it is a non-responsive theme.

Responsive themes – all latest themes like Slick, Cento, Paper, etc. are completely responsive and the button element is generated from CSS code.

Case 1 – Adding Custom Button Images on Non-responsive Themes

The important feature of Weebly button element is its capability to adjust to the length of the text. The button will get auto adjusted according to the length of the text entered. This is achieved by splitting a button into two images.

Before going further, follow the below steps to understand where are the button images stored in a Weebly site.

  • Login to your Weebly account and choose the site for editing.
  • Navigate to “Theme” tab and click on the “Edit HTML / CSS” button.
  • Under “Assets” section you will see different button images as shown below:

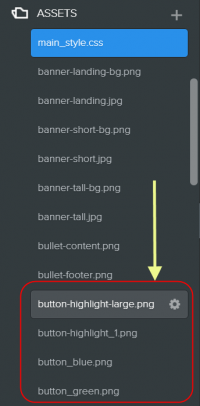
We noticed all non-responsive themes using images for buttons have 9 sets of images (total 18) for smaller and larger buttons but uses 2 specific images in CSS as a button’s background. Check “main_style.css” and find out what are the images used for buttons. The below example on City theme shows that “button-highlight.png” and “button-highlight-large.png” are used for smaller and larger buttons respectively.

Images-Used-for-Buttons-on-Non-Responsive-Themes-768x511

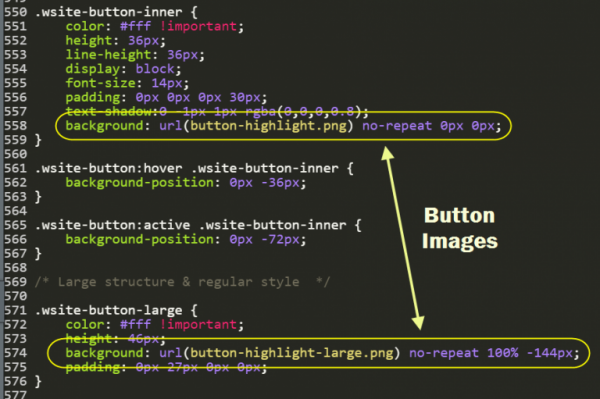
If you don’t like these buttons simply change the image to one of the available image from 9 sets. You an change “button-highlight.png” to “button-purple.png”. In case if you don’t like any of the existing button images then create your own custom images with similar sizes and split style and upload it under “Assets” section. Ensure to use the name of the image in “main_style.css” for the “background” property.

Case 2 – Customizing CSS Buttons on Non-Responsive Themes

If you do not find any button images under “Assets” section of your non-responsive theme then check the “main_style.css” to see the “Buttons” section. Below is the CSS code from Cleancut theme which can be customized background, colors, hover effect, etc. as you need.


/* Buttons
--------------------------------------------------------------------------------*/

/* Small structure & regular style */

.wsite-button {
background: red;
background: -moz-linear-gradient(top,#444 0,#333 100%);
background: -webkit-gradient(linear,left top,left bottom,color-stop(0,#444),color-stop(100%,#333));
background: -webkit-linear-gradient(top,#444 0,#333 100%);
background: -o-linear-gradient(top,#444 0,#333 100%);
background: -ms-linear-gradient(top,#444 0,#333 100%);
background: linear-gradient(top,#444 0,#333 100%);
border: 1px solid #000;
box-shadow:inset 0 0 15px rgba(0,0,0,0.25);
-moz-border-radius: 3px;
border-radius: 3px;
color: white !important;
font-size: 13px;
font-weight: 700;
padding: 3px 25px;
text-align: center;
text-decoration: none !important;
text-shadow: 0px -1px 1px rgba(0,0,0,0.7);
}

.wsite-button:hover {
background-position:0 0;
box-shadow:0 1px 4px rgba(0,0,0,0.3);
}

.wsite-button:active {
background-position:0 0;
}

.wsite-button-inner {
color: #fff !important;
padding:0;
background: none;
}

.wsite-button:hover .wsite-button-inner {
background:none;
}

.wsite-button:active {
padding:4px 25px 2px;
}

/* Large structure & regular style */

.wsite-button-large .wsite-button-inner {
font-size:14px;
padding:0;
}
.wsite-button-large .wsite-button-inner {
background: none;
}

/* Highlighted styles */

.wsite-button-highlight, .wsite-button-large.wsite-button-highlight {
background: #0370EA;
background: -moz-linear-gradient(top,#0370EA 0,#0370EA 100%);
background: -webkit-gradient(linear,left top,left bottom,color-stop(0,#0370EA),color-stop(100%,#0370EA));
background: -webkit-linear-gradient(top,#0370EA 0,#0370EA 100%);
background: -o-linear-gradient(top,#0370EA 0,#0370EA 100%);
background: -ms-linear-gradient(top,#0370EA 0,#0370EA 100%);
background: linear-gradient(top,#0370EA 0,#0370EA 100%);
border: 1px solid #0052ad;
box-shadow:inset 0 0 18px rgba(0,0,0,0.02);
}

.wsite-button-highlight:hover , .wsite-button-large.wsite-button-highlight:hover {
box-shadow:0 1px 4px rgba(0,0,0,0.3);
}

.wsite-button-highlight .wsite-button-inner {
background-image: none;
}

.wsite-button-large.wsite-button-highlight .wsite-button-inner {
background-image: none;
}

Now go back to the editor and drag the button element to the content area. You can see the button will be with the new style as you defined in “main.less“.

If you liked this tutorial, then you may consider subscribing to our WeeblyTutorials YouTube Channel for Weebly video tutorials. You can also find us on Twitter and Facebook.

Adding or Updating Weebly’s Store Information

This article explains how to add or update your Weebly’s store information.


Adding or Updating Weebly’s Store Information

To do so, you must first navigate to your Weebly site’s store editor.

  1. In the Add Store Information section, hit Add Information.
  2. For each of the following sections, hit the Edit button in the top right-hand corner and add or update the needed information.

Store Information

Weebly Store Information

Related: How to Add a Product Category to your Weebly Store

General

Weebly Store Information

Layout

Weebly Store Layout

Tracking

Tracking

The next step is to add products to your Weebly store. Here is how to add products in Weebly.

If you liked this tutorial, then you may consider subscribing to our WeeblyTutorials YouTube Channel for Weebly video tutorials. You can also find us on Twitter and Facebook.

Add products in Weebly store

How to Add Products in your Weebly Store

The actual tutorial explains how to add products to your Weebly Store. Adding products would allow you to have a fully functional Weebly store so you can start selling your items.


How to Add Products in your Weebly Store

To do so, you must first navigate to your Weebly site’s store editor.

  1. Click Items then click +Add Products.
  2. Input information for your product.
    • Product Information: Enter general information about the product here.
    • Product Options: Click +Add Options to add options to the product.
    • Product Images: Click Add Images to upload a product image to go with the product.
    • Advanced Options: Click Show to display SEO options.

Add products in Weebly store

Related: How to Create an Online Store with Weebly

If you liked this tutorial, then you may consider subscribing to our WeeblyTutorials YouTube Channel for Weebly video tutorials. You can also find us on Twitter and Facebook.

Add category in Weebly

How to Add a Product Category to your Weebly Store

This tutorial shows how to add categories to your Weebly Store website. Adding categories for your products would allow you to better organize your Weebly store.


How to Add a Category in Weebly Store

To do so, you must first navigate to your Weebly site’s store editor.

  1. In the left sidebar, click Items.
  2. A drop-down under Products will appear. Click Categories Add category in Weebly
  3. In the right upper corner, click + Add Category
  4. Input information for your new category in the shown text fields such as image category etc.

Performing the listed above steps, you will be able to add a category in your Weebly store. You can add more categories by repeating this process.

Related: How to Create an Online Store with Weebly

If you liked this tutorial, then you may consider subscribing to our WeeblyTutorials YouTube Channel for Weebly video tutorials. You can also find us on Twitter and Facebook.