We have scoured the internet and put together a list of free image resources that you can use on your Weebly website. These resources host thousands of free Images which you can download and use on your Weebly website for free.
Weebly has been undergoing some pretty big changes lately. With Square aquired Weebly promising to revolutionize Weebly development, and Weebly development team promising to do the same for the user interface, it’s not surprising if you find it all a lot to take in.
But what impact will these changes really have, and what do they mean for the future of Weebly and the community behind it?
In this article we’re going to analyze and make some predictions regarding the future of Weebly.
What’s Changing?
There has been one big change in Weebly in the last year. Weebly acquired by Square. Also, a few other minor changes as Weebly development team promising to revolutionize the user interface in Weebly and much more.
Square Acquired Weebly
In a press statement released on April 26, 2018, Square confirmed that an “Addition of website-building company will enable sellers to easily start or grow an omnichannel business with one cohesive solution”.
Weebly also has published a press statement mentioning that it got acquired by Square, the company that(s mainly enables online sellers to accept card payments worldwide.
The Impact of These Changes
So what does all this mean? Well, according to Weebly, nothing will be changing aside from extra payment processing options!
Will my Weebly service be affected? No. We will continue to run the same service you know and love. And we’ll continue creating an even more integrated and powerful experience for you — with the combined effort of Square, we plan to bring you new products and services to help make running your business easier and better.
That clearly means your Weebly website should function and continue on as before, as this acquisition is mainly driven by eCommerce purposes. They just would like to have more and better online payment processing in Weebly platform.
Final Thoughts
At the end of the day, nobody can predict the future. Who knows what tomorrow holds?
Do you ever want to add captions to your images in Weebly? Captions are short text descriptions. They are typically used to provide additional details.
The good thing is that Weebly has the needed built-in option to easily add a caption for each uploaded image in your website.
In this article, we will explain how to easily add a caption to images in Weebly.
Adding Caption to Images in Weebly
The first thing you need to do is to add an image to your Weebly site. On the Weebly Site Editor screen, drag the ‘Images’ element and drop it wherever you want to add the image.
Now you have added the image, all what you have to do is to click on the image, a box will appear, you need to scroll down and click on Caption. A text field will appear so you can enter insert your caption.
Here’s a Video Tutorial on How to Add Caption to Images in Weebly
Weebly per default navigation menu lets you create drop-down sub-menus but this article is made available if you ever want to have a mega menu in your weebly website.
Let’s take a look at how to easily create a mega menu navigation in Weebly.
Video tutorial
As you might have seen, for now, we only have to use a Weebly App called “Mega Menu” to create a mega menu in Weebly. There’s unfortunately no other way to do it for free.
In this post we’re going to show you different websites built with Weebly. These aren’t the best Weebly websites – you’ll probably find a lot more creative and effective Weebly websites out there. But we feature the ones we managed to handpick from several sources including Weebly’s official blog and Google search.
Well, let’s get inspired by the beautiful templates and amazing websites that were created with Weebly.
10 Great Sample Weebly Websites to Get you Inspired
A landing page is a is usually designed to get your visitors’ attention. For example, getting their emails via a web form. They are designed to target a specific audience depending on the product you are marketing.
In this article, we are going to explain how to create a landing page in Weebly. That would be the entry point of your website.
Creating Landing Pages With Weebly
There used to be a simple feature to add landing pages in Weebly, but this was unfortunately disconnected by Weebly.
We will discuss the option we have right now to have your Weebly landing pages built.
To start, you can add a new page to your Weebly website, or work on any existing one with a splash layout. Once done, you can add the content you’d like to on your landing page then you’ll likely want for sure to hide the navigation on that page.
In this example, we have used “Unite 2 – Business “as the theme for a restaurant website. We chose the Splash page as layout type
So far looks great but we would like to hide the navigation so that the page will have only the content we put in the middle.
Most browsers nowadays come with an extremely useful tool called the “Inspector”. There are many interesting things you can do with this tool, though in our example we just need to get the class or ID of the element that has the navigation menu.
To do so, right-click or CTRL-click on your navigation, then choose “Inspect”.
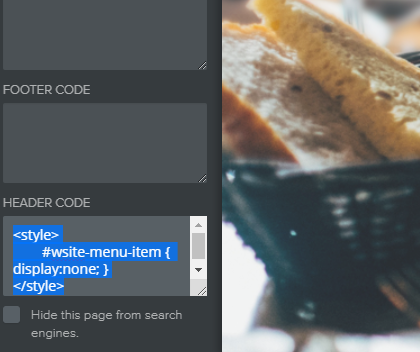
A new window will popup, and the element you right-clicked on will be selected within the code displayed. Inspector tool makes this really handy because it will highlight the element on the page. You can see in our screenshot that the element we want to hide has an ID of “wsite-menu-item”.
Next, go back to the Weebly Site Editor and go to the Pages tab. Select the landing page in object, then click on “SEO Settings”. In the Header Code field, enter this code:
Now you just need to re-publish your Weebly website and you’ll see your landing page live.
Are you guys using landing pages in your Weebly websites? Can you share your experience and/or challenges you’ve found along the way? We’d love to hear all about it!
Do you want to add a privacy policy on your Weebly website? Privacy laws require you to have a Privacy Policy on your website if you collect personal information from your visitors. In this tutorial, we are going to show you how to easily add a privacy policy in Weebly.
Do I Really Need a Privacy Statement on my Weebly Website?
In many countries, websites are required by law to disclose the information they collect about their visitors, if any, and how this information is used.
Here are some of the ways in which a typical Weebly website collects user information.
Name and email address in comment forms
Comment form cookie which remembers a user’s name or email address.
Advertising programs like Google Adsense which track users
In short, any website should have a privacy policy page. It protects your business and helps build consumer trust.
What to Include in a Privacy Policy?
It’s really simple. You basically need to list all the ways you collect user information on your website.
Adding a Privacy Policy in Weebly
First, you’d need to add a page via your Weebly Site Editor. You obviously should name your page Privacy Policy, so that your users immediately know what this page is about.
Next, you need to add the content for your privacy policy page. There are a bunch of online privacy policy generators that you may use in this matter.
Adding Link to Privacy Policy in Weebly
Websites usually display link to their privacy policy page in the footer area. This way the link appears on every page but is not taking space in your main navigation menu.
To do that, you just need to click on the footer area from your Weebly Site Editor and you’ll be able to enter the link to your newly added page.
There are a few reasons on why one would want to rename a Weebly contact form. Well, one of the most obvious reasons is to distinguish the submissions if you have two or more forms on your website.
When a submission is delivered to an email address, we can distinguish one form from the other using the email subject.
Imagine you have a contact form for the following pages:
Contact
Service request, etc.
By default, Weebly names every form as “CONTACT FORM”. Which means a submission on service request or contact page will both have same email subject: “Contact Form”.
There are a few ways on how to translate your Weebly website’s contents into other languages. This tutorial provides some solutions to help you create a Multi Language Weebly website.
Multi Language Weebly Website with Google Website Translator
Google website translator gives quite an easy way to translate your website in different languages. The tool is very popular but sadly Google has discontinued this service.
Multilingual Weebly Website with Bablic Website Translator
Bablic website translator is a different workaround for having your Weebly website translated. It has both free and premium versions.
Multilingual Weebly Website with Bing Website Translator
Bing website translator can translate your website to so many languages. From here, you can customize the widget and get the code. You may then drag and drop “Weebly EMBED CODE element” anywhere on all the pages you want translation available.
If you’re planning to start over and create your website from scratch, this article is for you! Here we’re showing you how to reset a Weebly website back to its default.
How to Reset a Weebly Website
Weebly does not, unfortunately, have a button or a feature to just let you reset the website. For this, here’s our recommended workaround.
Delete any added pages and elements. Here’s how: Click the “Pages” tab at the top. Find the page you wish to delete on the left side. Click the page and at the bottom you will find a ‘Delete’ button.