Skip to content Skip to main navigation Skip to footer

Tutorials

create gift cards with Weebly

Use and Create Gift Cards with Weebly

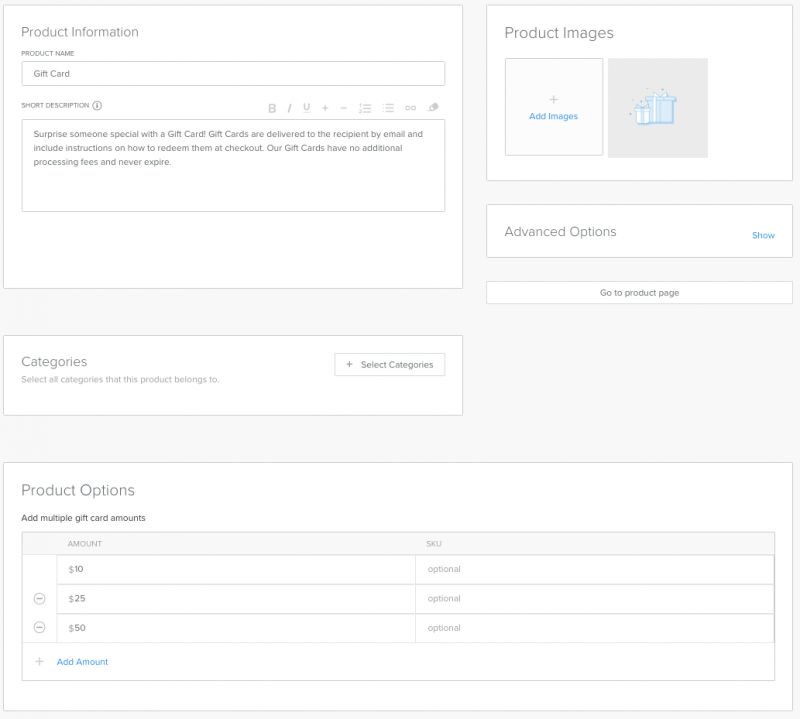
This article sheds the light on how one create gift cards with Weebly. Gift cards on Weebly can be created like any other products. You enter a name for the card, upload an image, and then offer different denominations, configured as product options. For example, you might offer a $10, a $25, and a $50 gift card.


How to Create Gift Cards with Weebly

As mentioned above, along with physical, digital, and service products, anyone can also offer gift cards. Well, here’s how to create gift cards with Weebly:

First of all, you’ll need to enable gift cards for your Weebly website by going to Store > Products > Gift Cards and select Enable.

weebly gift card

Second, set up your gift card in mostly the same way you setup your other products (Store > Products, and click Add Product.).

Giftcard product Weebly

There you go! You’re all set. You can display te gift card on your website like any other product.

We hope this article helped you learn how to create gift cards in Weebly. You may also want to see our guide on how to embed Javascript code in Weebly.

If you liked this tutorial, then you may consider subscribing to our WeeblyTutorials YouTube Channel for Weebly video tutorials. You can also find us on Twitter and Facebook.

Weebly Payment Methods for Online Store Cart Checkout

Weebly business plan allows website owners to start their online stores. Well, this article sheds the light on the different payment methods that weebly offers for online store cart checkout.


Weebly Payment Methods

Weebly supports the following four payment gateway options:

  • Stripe
  • Square
  • Authorize.Net
  • PayPal

Weebly payment methods

Stripe Payment Gateway

It’s actually one of the very first payment methods offered by Weebly. All Weebly users can accept payments through Stripe including free plan users.

Square Payment Gateway

Square is one of the payment methods offered by Weebly for business plan users to accept payments. It allows to accept credit cards instantly.

Authorize.Net

Authorize.Net is also the payment gateways offered by Weebly only for business plan users.

PayPal

PayPal is definitely the most simple payment method offered for all Weebly business users.

Comparison of Weebly Payment Methods

Weebly payment methods

We hope this article helped you learn more about the different payment methods that Weebly offers. You may also want to see our guide on how to embed Javascript code in Weebly.

If you liked this tutorial, then you may consider subscribing to our WeeblyTutorials YouTube Channel for Weebly video tutorials. You can also find us on Twitter and Facebook.

weebly countdown timer

How to Add a Countdown Timer to Weebly

This article explains how one can add a countdown timer to Weebly. Countdown timers can be used in several situations. They are useful in case of any events. For example, future event, such as wedding, birthday, graduation, begin of a major sale, the next holiday, and so on.


Add a Countdown Timer to Weebly

#1. Add a Countdown Timer  using a Weebly App

The most easiest and most-forward way is to simply add a Weebly app that does the job. Lots of apps dedicated to such features. Here’s one of them that allows us to add a countdown timer.

add countdown timer to weebly

#2. Manually Add a Countdown Timer  to Weebly

You can use the Embed Code element in Weebly to manually add this feature. You will just need to add a Javascript code to your Weebly website and the countdown timer will display.

[fusion_code]Jmx0OyEtLSBEaXNwbGF5IHRoZSBjb3VudGRvd24gdGltZXIgaW4gYW4gZWxlbWVudCAtLSZndDsKJmx0O3AgaWQ9JnF1b3Q7ZGVtbyZxdW90OyZndDsmbHQ7L3AmZ3Q7CgombHQ7c2NyaXB0Jmd0OwovLyBTZXQgdGhlIGRhdGUgd2UmI3gyNztyZSBjb3VudGluZyBkb3duIHRvCnZhciBjb3VudERvd25EYXRlID0gbmV3IERhdGUoJnF1b3Q7U2VwIDUsIDIwMTggMTU6Mzc6MjUmcXVvdDspLmdldFRpbWUoKTsKCi8vIFVwZGF0ZSB0aGUgY291bnQgZG93biBldmVyeSAxIHNlY29uZAp2YXIgeCA9IHNldEludGVydmFsKGZ1bmN0aW9uKCkgewoKICAvLyBHZXQgdG9kYXlzIGRhdGUgYW5kIHRpbWUKICB2YXIgbm93ID0gbmV3IERhdGUoKS5nZXRUaW1lKCk7CgogIC8vIEZpbmQgdGhlIGRpc3RhbmNlIGJldHdlZW4gbm93IGFuIHRoZSBjb3VudCBkb3duIGRhdGUKICB2YXIgZGlzdGFuY2UgPSBjb3VudERvd25EYXRlIC0gbm93OwoKICAvLyBUaW1lIGNhbGN1bGF0aW9ucyBmb3IgZGF5cywgaG91cnMsIG1pbnV0ZXMgYW5kIHNlY29uZHMKICB2YXIgZGF5cyA9IE1hdGguZmxvb3IoZGlzdGFuY2UgLyAoMTAwMCAqIDYwICogNjAgKiAyNCkpOwogIHZhciBob3VycyA9IE1hdGguZmxvb3IoKGRpc3RhbmNlICUgKDEwMDAgKiA2MCAqIDYwICogMjQpKSAvICgxMDAwICogNjAgKiA2MCkpOwogIHZhciBtaW51dGVzID0gTWF0aC5mbG9vcigoZGlzdGFuY2UgJSAoMTAwMCAqIDYwICogNjApKSAvICgxMDAwICogNjApKTsKICB2YXIgc2Vjb25kcyA9IE1hdGguZmxvb3IoKGRpc3RhbmNlICUgKDEwMDAgKiA2MCkpIC8gMTAwMCk7CgogIC8vIERpc3BsYXkgdGhlIHJlc3VsdCBpbiB0aGUgZWxlbWVudCB3aXRoIGlkPSZxdW90O2RlbW8mcXVvdDsKICBkb2N1bWVudC5nZXRFbGVtZW50QnlJZCgmcXVvdDtkZW1vJnF1b3Q7KS5pbm5lckhUTUwgPSBkYXlzICsgJnF1b3Q7ZCAmcXVvdDsgKyBob3VycyArICZxdW90O2ggJnF1b3Q7CiAgKyBtaW51dGVzICsgJnF1b3Q7bSAmcXVvdDsgKyBzZWNvbmRzICsgJnF1b3Q7cyAmcXVvdDs7CgogIC8vIElmIHRoZSBjb3VudCBkb3duIGlzIGZpbmlzaGVkLCB3cml0ZSBzb21lIHRleHQgCiAgaWYgKGRpc3RhbmNlICZsdDsgMCkgewogICAgY2xlYXJJbnRlcnZhbCh4KTsKICAgIGRvY3VtZW50LmdldEVsZW1lbnRCeUlkKCZxdW90O2RlbW8mcXVvdDspLmlubmVySFRNTCA9ICZxdW90O0VYUElSRUQmcXVvdDs7CiAgfQp9LCAxMDAwKTsKJmx0Oy9zY3JpcHQmZ3Q7[/fusion_code]

Here are the lines of code that you can copy paste in order to have the above countdown timer:

<script>

// Set the date we're counting down to

var countDownDate = new Date("Sep 5, 2018 15:37:25").getTime();

// Update the count down every 1 second

var x = setInterval(function() {  // Get todays date and time  var now = new Date().getTime();  

// Find the distance between now an the count down date  var distance = countDownDate - now;  

// Time calculations for days, hours, minutes and seconds  var days = Math.floor(distance / (1000 * 60 * 60 * 24));  var hours = Math.floor((distance % (1000 * 60 * 60 * 24)) / (1000 * 60 * 60));  var minutes = Math.floor((distance % (1000 * 60 * 60)) / (1000 * 60));  var seconds = Math.floor((distance % (1000 * 60)) / 1000);  

// Display the result in the element with id="demo"  document.getElementById("demo").innerHTML = days + "d " + hours + "h "  + minutes + "m " + seconds + "s ";  

// If the count down is finished, write some text   if (distance < 0) {    clearInterval(x);    document.getElementById("demo").innerHTML = "EXPIRED";  }}, 1000);</script>

You can for sure look for any other countdown timer code in Google and add it using the same method.

We hope this article helped you learn how to add a countown timer in Weebly. You may also want to see our guide on how to embed Javascript code in Weebly.

If you liked this tutorial, then you may consider subscribing to our 
WeeblyTutorials YouTube Channel for Weebly video tutorials. You can also find us on Twitter and Facebook.

How to Undo Changes in Weebly

Everyone makes mistakes — pretty obvious. That’s why we’ve written this article. Here we explain how to undo changes in Weebly.


How to Undo Changes in Weebly

Mistakenly switched theme? You can go back to a previous theme easily – just click on the Themes tab, then on Change Theme, and then on the Recently Used tab. You should see your previous theme there.

undo changes weebly

Made a mistake while typing in a text element? If the cursor is still inside the text element, then you can use the undo and redo arrows to perform several levels of undo and redo.

undo changes weebly

Accidentally deleted a page? It’s possible to recover deleted pages. Follow this procedure on how to restore a Weebly website. Provide Weebly support with the name of the page you deleted, the name of the website, and the date when you deleted the page.

Accidentally delete a website? Same thing to the above solution. Follow this procedure on how to restore a Weebly website. Provide Weebly support with the name of the site and approximately when you deleted it.

Here’s a quick rundown of what Weebly cannot restore for you:

  • Blog posts or drafts that were deleted
  • Sections deleted from a page.
  • Contact Form entries that were deleted
  • Uploaded images or files that were deleted
  • Products or categories deleted from the Store
  • Custom themes that have been deleted from the Themes tab
  • Files/images deleted from the assets area of the code editor
  • Elements deleted from a page
  • Members and Member Groups deleted from Settings > Members
  • Apps from the App Center that you removed via Settings > My Apps (you can just re-add them from the App Center, though)

We hope this article helped you learn how to undo changes in Weebly. You may also want to see our guide on how to embed Javascript code in Weebly.

If you liked this tutorial, then you may consider subscribing to our WeeblyTutorials YouTube Channel for Weebly video tutorials. You can also find us on Twitter and Facebook.

embed code element weebly

How to Use Embed Code Element in Weebly

“Embed Code” is one of the most useful elements in Weebly site editor. It is used to insert any custom HTML, CSS or JavaScript code to add additional functionalities and features. There are multiple ways to use embed code element and it is important for Weebly websites’ owners to understand how it works.


How to Use Embed Code Element in Weebly

You can add a variety of external content to your Weebly website using the Embed Code element. Here’s where to find the tool in object in Weebly site editor:

embed-code-Weebly

We’ve prepared three in-depth tutorials that walk you through inserting different types of external contents to Weebly:

We hope this article helped you learn how to use the embed code element in Weebly. You may also want to see our guide on how to embed Javascript code in Weebly.

If you liked this tutorial, then you may consider subscribing to our WeeblyTutorials YouTube Channel for Weebly video tutorials. You can also find us on Twitter and Facebook.

Add CSS to Weebly

How to Add Custom CSS Code in Weebly

CSS stands for Cascading Style Sheets. It’s used to define the style of an element. This tutorial walks you through the process of adding custom CSS code to a Weebly website.


Add Custom CSS Code in Weebly

Most of the CSS defined parameters on a Weebly website are stored under “main_style.css” or “global.less” file in newer themes, which can be accessed through the path “Theme > Edit HTML / CSS > Assets”.

Add CSS to Weebly

We hope this article helped you learn how to add CSS code in Weebly. You may also want to see our guide on how to embed Javascript code in Weebly.

If you liked this tutorial, then you may consider subscribing to our WeeblyTutorials YouTube Channel for Weebly video tutorials. You can also find us on Twitter and Facebook.

Embed javascript to Weebly

How to Embed Javascript Code in Weebly

This article explains how to embed JavaScript code in a Weebly website. There are hundreds of reasons on why someone would add a custom script to any website. One of those reasons is for example to add any additional feature that doesn’t exist per default on your chosen Weebly theme.


Embed Javascript code in Weebly

There are different ways on how we can add Javascript in Weebly. Mainly, three different ways to add scripts based on the need and usage.

  • Linking an external script file – effective on site level
  • Embedding within header and/or footer of a specific page – effective on page level
  • Adding within the content of a page – effective on element level

Linking an External Script File

Some kind of functions need a script file to be linked at site level. This is when you’ll need to link an external script file.

You’ll need to attach the .js file in object via Weebly Site Editor following these steps: “Design > Edit HTML/CSS > Assets”.

Hit on the + icon then select “Upload File(s)” and attach the script file.

Once file is uploaded, you’ll need to link the file at a website level always via the weebly Site Editor and following these steps: “Settings > SEO > Footer Code” section using the below code:

Embedding within header and/or footer of a specific page

The previous explained method allows us to embed Javascript at website level which is useful for certain features. However, if we’re taking a feature that requires to embed a code to a particular page, say for example a tracking code for a product page, will definitely need to add the code to a page level.

In order to add Javascript at a page level, you’ll need to paste the following lines of code under “Pages > Select a page > Advanced Settings > Footer Code”.

Adding Javascript Within the Content of a Page

In order to embed a script at an element level, you have to use “Embed Code” element to paste the script along with the HTML / CSS code.

We hope this article helped you learn how to embed Javascript in Weebly. You may also want to see our guide on how to add HTML code to Weebly.

If you liked this tutorial, then you may consider subscribing to our WeeblyTutorials YouTube Channel for Weebly video tutorials. You can also find us on Twitter and Facebook.

Add social media icons in Weebly

How to Add Social Media Icons in Weebly

Having links to your social media accounts helps for sure your audience find you online and attract even more followers. Well, this tutorial walks you through the process of adding the social media icons in Weebly.


How to Add Social Media Icons in Weebly

The social media icons can be added to Weebly using simply the Social Icons element. The element has around 13 social networks you can link to in any combination you want.

Find it in the More section of the Build tab and drag it to your page to get started.

Add social media icons in Weebly

Clicking on the added icons will display the following windows:

Social media icons in Weebly

You can basically manage everything from there.

We hope this article helped you learn how to add social media icons in Weebly. You may also want to see our guide on how to access and use the Weebly Site Editor.

If you liked this tutorial, then you may consider subscribing to our WeeblyTutorials YouTube Channel for Weebly video tutorials. You can also find us on Twitter and Facebook.

How to Create Anchor Links in Weebly

This article walks you through the process of adding anchor links. Anchors are special kind of links that will take you to a specific location on a page on your site instead of to a different website. Weebly currently doesn’t have a built-in feature to add anchor links, but we still can do it with a quick workaround.


How to Create Anchor Links in Weebly

In order to create the achnor link in Weebly, we’re going to use the Embed Code element. First, decide where you want to place your anchor and drag an Embed Code element just above or next to that spot. We’ll be using the “weeblytutorials” text as the anchor point, and the anchor name is weeblytutorials. You can use any word you like – it doesn’t have to be part of the text – but it is a good idea to choose an easy-to-remember name for the anchor.

Create anchor links in Weebly

Weebly anchor links

Next, decide where on the page you want to link from. In this case, it will be a call to action button in the header section. When entering the link, you’ll need to use the “Website URL” option and type in the full link to the page followed by #youranchorname. So if your website is www.weeblytutorials.com and the page you’re working on is about.html, it would look like this:

http://www.weeblytutorials.com/about.html#youranchorname

Here’s how it looks inside the editor for our example site:

Anchors Weebly

index.html refers to the homepage.

Don’t leave to uncheck the “New Window” option.

Our call to action button is as below:

Weebly anchor links

We hope this article helped you learn how to create anchor links in Weebly. You may also want to see our guide on how to access and use the Weebly Site Editor.

If you liked this tutorial, then you may consider subscribing to our WeeblyTutorials YouTube Channel for Weebly video tutorials. You can also find us on Twitter and Facebook.

How to Use the Weebly Site Dashboard

The Weebly Site Dashboard allows you to see your activity all in one place. Activities include but are not limited to: site stats, form entries and blog comments, as well as store sales.


How to Access and Use the Weebly Site Dashboard

Here’s how a Weebly Site Dashboard looks like:

Weebly Site Dashboard

There are several tabs on it. We’re going to check them each individually.

Account

Weebly Site Dashboard acount

The menu next to your name in the upper right has all the information for your account, a link to Weebly’s support center, and a link to log out.

On the Account page, one can view and perform changes to the Profile, Services, Payment Methods, Order History, and much more.

Account tab Weebly

Sites List

Every website has its own dashboard. At the top you’ll see the name of the currently selected site, its address and current plan.

Clicking on the arrow beside the site name will bring up a list of all your sites.

Weebly Site Dashboard

Stats

Weebly Stats

In that section, we can find a quick overview of the number of Unique Visitors and Pages Views for a specific period of time.

Form Entries

Weebly form entries

This section simply shows all the form entries submitted through your website.

Blog Comments

Weebly comments

Recent comments on any of your blog posts will appear here. You can manage everything related to the comments via this interface.

Store Orders

If you have a store, everything related to it will be shown in the Store Orders page.

We hope this article helped you learn how to master the Weebly Site Dashboard. You may also want to see our guide on how to access and use the Weebly Site Editor.

If you liked this tutorial, then you may consider subscribing to our WeeblyTutorials YouTube Channel for Weebly video tutorials. You can also find us on Twitter and Facebook.