
How to Add Different Types of Elements on Weebly2 min read

In order to add different types of elements such as images, text zones, videos, and so on, we will need then to add them as elements. They are the building blocks of a website. Mostly all the content you add to your web pages will be built with elements.

It is simple, you only need to find the element you want to use then Click, Drag and Drop it exactly where you want it. It’s literally: Find, Click, Drag, Drop.

It’s possible to add as many elements to a page as you want, and the page will just lengthen as you add more elements on top of, or below, the last. As you drag an Element to a page, this blue guide line will tell you where the element will be placed when you drop it.
Either stack elements on top of each other, or, drag one element to the left or right of another.

When you place elements side-by-side, we’ll generate two columns on the page that allot equal space to each element.
You can adjust the space between these columns by using the narrow bar that appears between them. Just click and drag to the left or right.

All elements have three universal options: Copy, Delete and Move.
Hover over an element and a blue box will appear.

The “X” in the upper right allows you to delete this element. Keep in mind though, once deleted, it can never come back.

The arrow in the upper left allows you to copy an element (to the same page or another page) to move an element (to another page).
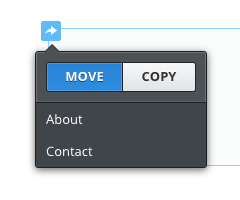
And clicking on the box between the “X” and the arrow, allows you to pick the element up and drag it around the page.

There you go. We’re done with this article. :)
If you liked this tutorial, then you may consider subscribing to our WeeblyTutorials YouTube Channel for Weebly video tutorials. You can also find us on Twitter and Facebook.

0 Comments